php reference: Documentation for the Honeybadger PHP client library (SDK) and platform.
# Honeybadger for PHP
> Documentation for Honeybadger's PHP error tracking library.
Hi there! You’ve found Honeybadger’s docs on **PHP exception tracking**. In these guides we’re going to discuss [`honeybadger-php`](https://github.com/honeybadger-io/honeybadger-php) and how to use it to track exceptions in your PHP applications. ## How you should read the docs [Section titled “How you should read the docs”](#how-you-should-read-the-docs) * If you’re installing Honeybadger in your **Laravel** application for the first time, check out the **[Laravel Integration Guide](/lib/php/integration/laravel/)**. If you use a different framework, start with the **[General Integration Guide](/lib/php/integration/other/)** instead. * The **How-To Guides** (in the left-hand navigation menu) are general guides on how to do things with the library, and should apply to all types of applications. * There is a wealth of additional knowledge about Honeybadger in the **Library Reference** and **Support** sections. ## Getting support [Section titled “Getting support”](#getting-support) If you’re having trouble working with the library (such as you aren’t receiving error reports when you should be): 1. Upgrade to the latest version if possible (you can find a list of bugfixes and other changes in the [CHANGELOG](https://github.com/honeybadger-io/honeybadger-php/blob/master/CHANGELOG.md)) 2. Check out our [Frequently Asked Questions](/lib/php/support/faq/) 3. Run through the [Troubleshooting guide](/lib/php/support/troubleshooting/) 4. If you believe you’ve found a bug, [submit an issue on GitHub](https://github.com/honeybadger-io/honeybadger-php/issues/) For all other problems, contact support for help:
# Capturing events with breadcrumbs
> Learn how to use breadcrumbs to track events leading up to errors.
When your application encounters an error, it’s often helpful to know what events occurred leading up to that. Honeybadger lets you do that with *breadcrumbs*. Breadcrumbs are records of events that happened within your application — external API calls, job dispatches, database queries, or anything that you think might be relevant. When we capture an error, we display these breadcrumbs in your dashboard to provide extra debugging information. 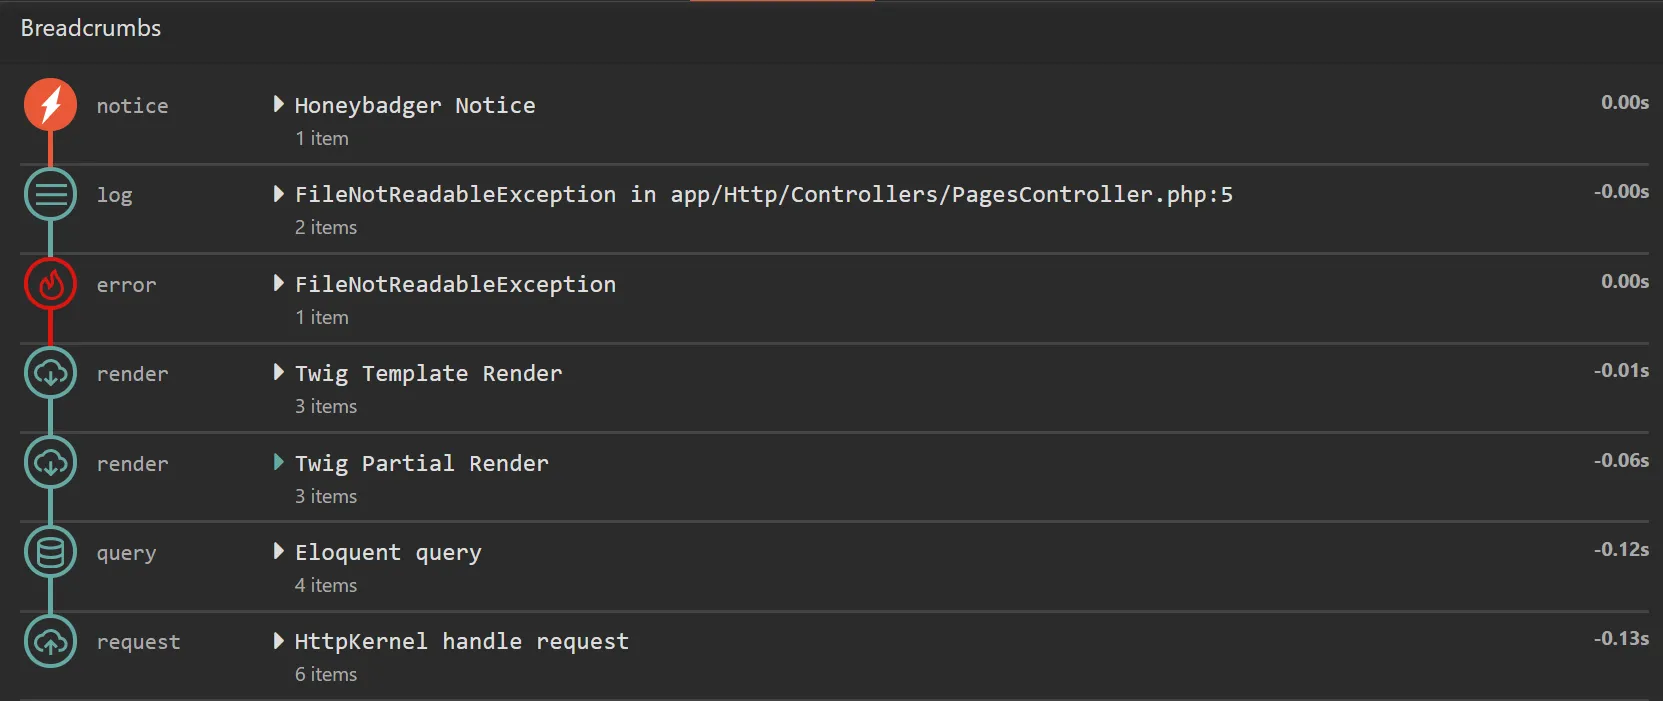 Use [context](/lib/php/errors/customizing-error-reports/#custom-metadata-context) to record request-global data like the current user ID; use breadcrumbs to record specific events within the request and their custom metadata. ## Automatic breadcrumbs [Section titled “Automatic breadcrumbs”](#automatic-breadcrumbs) If you’re using Laravel or Lumen, Honeybadger can automatically capture breadcrumbs from your app. By default, we’ll record: * [Log events](https://laravel.com/docs/logging) * [View renders](https://laravel.com/docs/views) * [Email dispatches](https://laravel.com/docs/mail) * [Job dispatches](https://laravel.com/docs/queues) * [Notification dispatches](https://laravel.com/docs/notifications) * [Database queries](https://laravel.com/docs/queries) * [Redis commands](https://laravel.com/docs/redis) * Incoming requests You can customise this with the `breadcrumbs` option in your `config/honeybadger.php`:
```php
'breadcrumbs' => [
'enabled' => true,
'automatic' => [
Breadcrumbs\DatabaseQueryExecuted::class,
Breadcrumbs\DatabaseTransactionStarted::class,
Breadcrumbs\DatabaseTransactionCommitted::class,
Breadcrumbs\DatabaseTransactionRolledBack::class,
Breadcrumbs\CacheHit::class,
Breadcrumbs\CacheMiss::class,
Breadcrumbs\JobQueued::class,
Breadcrumbs\MailSending::class,
Breadcrumbs\MailSent::class,
Breadcrumbs\MessageLogged::class,
Breadcrumbs\NotificationSending::class,
Breadcrumbs\NotificationSent::class,
Breadcrumbs\NotificationFailed::class,
Breadcrumbs\RedisCommandExecuted::class,
Breadcrumbs\RouteMatched::class,
Breadcrumbs\ViewRendered::class,
],
],
```
The `breadcrumbs.automatic` key contains the list of the events Honeybadger tracks by default. You can disable a specific event by removing or commenting out the appropriate line. ## Custom breadcrumbs [Section titled “Custom breadcrumbs”](#custom-breadcrumbs) You can also record breadcrumb events manually. This can be helpful if you aren’t using a supported framework, or there are additional events in your application that Honeybadger doesn’t recognize. To add a breadcrumb, use `$honeybadger->addBreadcrumb($message, $metadata, $category)`:
```php
$honeybadger = Honeybadger\Honeybadger::new(['api_key' => 'PROJECT_API_KEY']);
$honeybadger->addBreadcrumb("Notification sent", ['user_id' => $user->id, 'type' => 'welcome']);
$honeybadger->addBreadcrumb("Payment webhook received", ['service' => 'Stripe'], 'webhooks');
// If you're using Laravel or Lumen, you can also use the Facade or service container
app('honeybadger')->addBreadcrumb("Notification sent", ['user_id' => $user->id, 'type' => 'welcome']);
Honeybadger::addBreadcrumb("Notification sent", ['user_id' => $user->id, 'type' => 'welcome'], 'notifications');
```
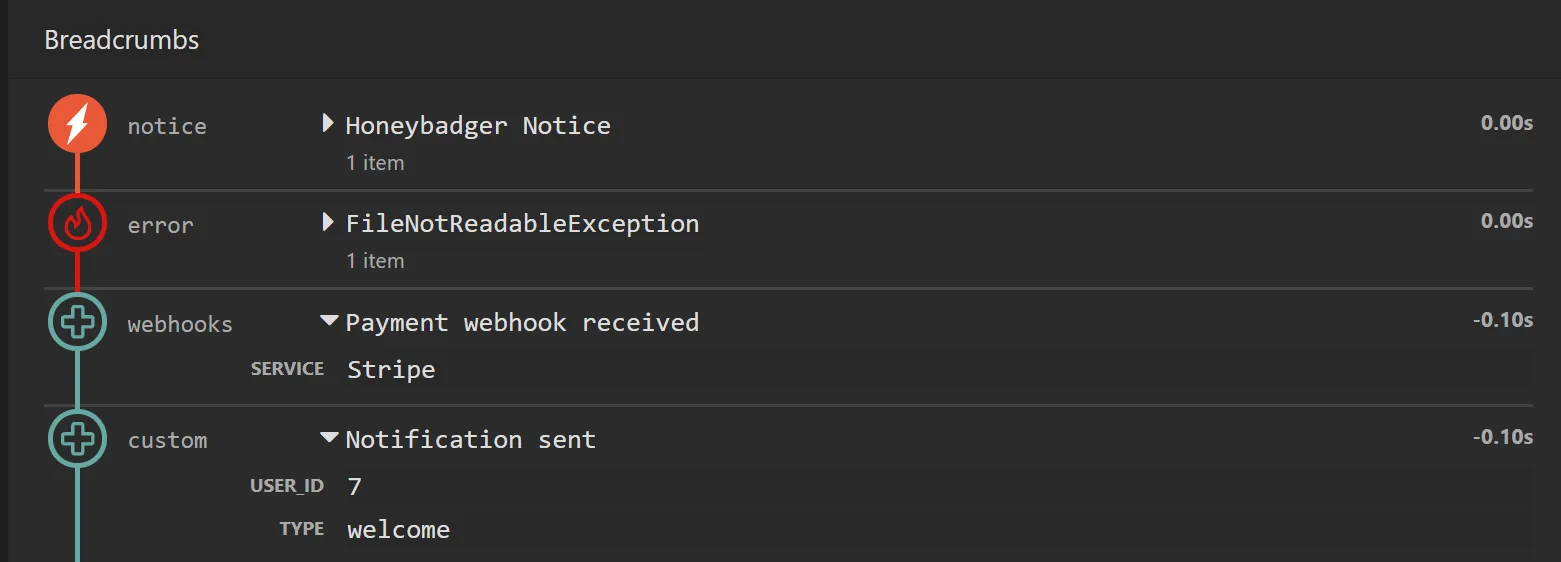 The `addBreadcrumb()` method has one required parameter, `message`. The message should be a terse summary of the event, which we’ll display prominently in the UI for each breadcrumb. You can also provide: * `metadata`, a key-value array of contextual data about the event. The metadata should be a single-level array with simple primitives as values (strings, integers, floats, or booleans). * `category`, a string key used to classify and group events. See [Categories](#categories) for more details. For each event, the Honeybadger client will automatically add a timestamp, so you don’t need to include that yourself. ## Categories [Section titled “Categories”](#categories) A `category` is a top level property of a breadcrumb. Categories are helpful so events can be presented differently on your project dashboard; for instance, `error` breadcrumbs are styled with a red “error” icon. Feel free to give a breadcrumb any category you wish. Any categories we don’t recognize will use the default ‘custom’ styling. Here are the recognized categories and a description of how you might categorize certain activity: | Category | Description | | -------- | ------------------------------------------- | | custom | Any other kind of breadcrumb | | error | A thrown error | | query | Access or Updates to any data or file store | | job | Queueing or Working via a job system | | request | Outbound / inbound requests | | render | Any output or serialization via templates | | log | Any messages logged | | notice | A Honeybadger Notice | ## Disabling breadcrumbs [Section titled “Disabling breadcrumbs”](#disabling-breadcrumbs) To turn off collection of breadcrumbs, use the `breadcrumbs.enabled` configuration option:
```php
$honeybadger = \Honeybadger\Honeybadger::new([
'api_key' => 'PROJECT_API_KEY',
'breadcrumbs' => [
'enabled' => false,
],
]);
```
When you do this, the Honeybadger client will stop any automatic collection of breadcrumbs and the `addBreadcrumb()` method will do nothing. ## Limits [Section titled “Limits”](#limits) We use the following limits on breadcrumbs to ensure the service operates smoothly for everyone: * We only store & transmit the last 40 breadcrumb events for any error. * Metadata can only hold scalar values (no objects, arrays or PHP resources) * String values have a maximum size of 64Kb
# Capturing function call arguments
> Configure PHP to include function arguments in error backtraces.
Sometimes it’s helpful to see what arguments a function was called with, so you can replicate the issue and figure out the cause of the error. By default, Honeybadger will automatically include function arguments when rendering the backtrace on your dashboard. However, on some versions of PHP, you may need to enable this. PHP 7.4 and later comes with the [zend.exception\_ignore\_args](https://www.php.net/manual/en/ini.core.php#ini.zend.exception-ignore-args) setting in the `php.ini` file. This setting is designed to protect you from accidentally divulging sensitive information to the outside world. When this setting is set to “On”, function arguments won’t be included in traces. If you expose your stack traces to outside users, you may want to keep this as “On”. However, if your traces are only sent to your logs and trusted services like Honeybadger, it’s typically safe to set this to “Off”. If you’d like Honeybadger to capture function arguments, you’ll need to set this to “Off”. To do this: * Locate your ini file by running `php --ini`. * Open the ini file and change the value of `zend.exception_ignore_args` to “Off”
```ini
; Allows to include or exclude arguments from stack traces generated for exceptions
; Default: Off
; In production, it is recommended to turn this setting on to prohibit the output
; of sensitive information in stack traces
zend.exception_ignore_args = Off
```
# Collecting user feedback
> Learn how to display error IDs and collect user feedback on Laravel error pages.
We don’t want our users to be interrupted by errors, but sometimes it does happen. Honeybadger helps you work with your users to fix errors by linking user requests to error occurrences and allowing users to leave relevant feedback on errors. If you’re using Laravel, the `honeybadger-io/honeybadger-laravel` package comes with a few handy Blade directives to make your error pages more proactive. ## Prerequisites [Section titled “Prerequisites”](#prerequisites) First off, you’ll need to [publish Laravel’s inbuilt error pages](https://laravel.com/docs/errors#custom-http-error-pages) or create your own. Then you can add our directives to the Blade template. If you’re using Laravel’s error views, the default base template is `minimal.blade.php`. Note that if you’re on development, you’ll only see [the Ignition error page](https://github.com/facade/ignition). To see the production error views, set `APP_DEBUG` in your `.env` file to `false`. ## Displaying the error ID [Section titled “Displaying the error ID”](#displaying-the-error-id) Whenever you send an error to Honeybadger, we return a unique UUID for that occurrence. You can easily jump to the error details at any time by visiting [https://app.honeybadger.io/notice/{the-error-uuid}](https://app.honeybadger.io/notice/%7Bthe-error-uuid%7D). You can also set the UUID to be automatically displayed on error pages, to serve as a reference. To do this, use the `@honeybadgerError` directive in your Blade error template:
```php
@yield('code')
@yield('message')
@honeybadgerError
```
You can place the directive anywhere you wish on your page, and we’ll replace it with
```plaintext
Error ID: {the error ID}
```
If you wish to style the error view or customize the text, you can also pass `class` or `text` arguments to the directive:
```php
@honeybadgerError(["class" => "uppercase text-gray-500", "text" => "Your error ID is: "])
```
## Displaying a feedback form [Section titled “Displaying a feedback form”](#displaying-a-feedback-form) 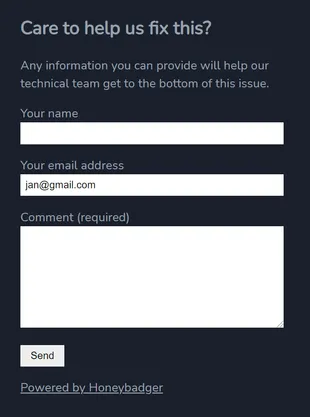 Honeybadger comes with an HTML form so users can provide additional helpful information about what led up to that error. Feedback responses are displayed inline in the Comments section on the error detail page. To include the feedback form on your error page, use the `@honeybadgerFeedback` directive. You can change the text displayed in the form via the [Laravel localization system](https://laravel.com/docs/localization). Here’s an example: resources/lang/vendor/honeybadger/en/feedback.php
```php
return [
'thanks' => 'Thanks for the feedback!',
'heading' => 'Care to help us fix this?',
'explanation' => 'Any information you can provide will help our technical team get to the bottom of this issue.',
'labels' => [
'name' => 'Your name',
'phone' => 'Your phone number',
'email' => 'Your email address',
'comment' => 'Comment (required)',
],
'submit' => 'Send',
];
```
## Advanced customization [Section titled “Advanced customization”](#advanced-customization) We’ve optimized the error ID and feedback form so they render well in the default Laravel error template (`minimal.blade.php`), but your setup might be different from that. In that case, you can publish the corresponding views and customize them as you like:
```bash
php artisan vendor:publish --tag honeybadger-views
```
The views will be published to `resources/views/vendor/honeybadger`, where you can customize them as you wish, and Laravel will load your customized version.
# Customizing error grouping
> Learn how to customize how errors are grouped in Honeybadger.
Honeybadger groups similar exceptions together using rules which we’ve found to work the best in most cases. The default information we use to group errors is: 1. The file name, method name, and line number of the error’s location 2. The class name of the error 3. The component/controller name We use this information to construct a “fingerprint” of the exception. Exceptions with the same fingerprint are treated as the same error in Honeybadger. You can customize the grouping for each exception by changing the error class name, component, or stack trace—or by sending a custom fingerprint. The `fingerprint` option can be used to override the fingerprint for an exception reported with the `notify()` method:
```php
$honeybadger->notify(exception, $request, ['fingerprint' => 'a unique string'])
```
# Customizing error reports
> Learn how to customize error reports with metadata and request information.
Honeybadger has several ways to customize the data reported with each error to add custom metadata and request information. ## Custom metadata (context) [Section titled “Custom metadata (context)”](#custom-metadata-context) Honeybadger can display additional custom key/value metadata — or “context” — with each error report. Context data can be anything, but a few keys have a special meaning in Honeybadger. Use `$honeybadger->context();` to add global context to error reports:
```php
$honeybadger->context('user_id', 123);
// Add multiple context items:
$honeybadger->context([
'user_id' => 123,
'user_email' => 'homer@simpsons.com',
]);
```
*** While you can add any key/value data to context, a few keys have special meaning in Honeybadger: | Option | Description | | ------------ | ----------------------------------------------------------------------------------------------------- | | `user_id` | The `String` user ID used by Honeybadger to aggregate user data across occurrences on the error page. | | `user_email` | Same as `user_id`, but for email addresses | ## Sending request information [Section titled “Sending request information”](#sending-request-information) Honeybadger automatically includes request information for error reports in Laravel/Lumen. In other frameworks which rely on Symphony’s HttpFoundation component, you can include request information when reporting exceptions:
```php
$honeybadger->notify($error, $request);
```
# Environments
> Configure environments in Honeybadger for PHP applications.
Honeybadger groups errors by the environment they belong to. You don’t have to set an environment, but it can be useful if you’re running your app in different locations, such as “production” and “staging”. To set the environment in Honeybadger, add the `environment_name` setting to your [configuration](/lib/php/reference/configuration/):
```php
[
'environment_name' => 'production',
]
```
Honeybadger reports errors in all environments that also have an API key configured.
# Filtering sensitive data
> Learn how to filter sensitive data from error reports.
When Honeybadger includes request or environment data in error reports, you may want to exclude sensitive keys. We try to provide sane defaults, but you should always review the data you’re reporting to make sure you aren’t leaking sensitive information. There are two types of potentially sensitive data in Honeybadger: [Request Parameters](#request-parameters) and [Environment Keys](#environment-keys). ## Request parameters [Section titled “Request parameters”](#request-parameters) You can filter sensitive request parameters using the [`request['filter']` configuration option](/lib/php/reference/configuration/). The value should be an array of keys to filter. Honeybadger filters the following keys by default:
```php
[
'request' => [
'filter' => [
'password',
'password_confirmation'
],
],
]
```
## Environment keys [Section titled “Environment keys”](#environment-keys) Honeybadger maintains a [whitelist of environment keys](/lib/php/reference/configuration/#environment-whitelist), so you don’t usually have to worry about leaking sensitive configuration such as API keys or passwords to 3rd-party services. If you *do* need to filter some of the default keys, Honeybadger has you covered with the `environment['filter']` configuration option. You can also add additional keys to the whitelist with the `environment['include']` option, if you’re sure you always want to report them:
```php
[
'environment' => [
// Environment keys to filter before the payload sent to Honeybadger
'filter' => [],
// Additional environment keys to include
'include' => [],
],
]
```
# Reducing noise
> Learn how to ignore exceptions and reduce alert fatigue in your php applications.
Sometimes there are errors that you would rather not send to Honeybadger because they are not actionable or are handled internally. In Honeybadger, you can [ignore exceptions by type](#ignoring-exceptions-by-type) using the built-in `excluded_exceptions` configuration option, as well as the `$dontReport` option in [Laravel](#laravel). You can also disable error reporting in all or some environments. ## Ignoring exceptions by type [Section titled “Ignoring exceptions by type”](#ignoring-exceptions-by-type) There may be some types of exceptions which you never want to report. To ignore them, use the `excluded_exceptions` [configuration option](/lib/php/reference/configuration/):
```php
[
'excluded_exceptions' => [
SomeException::class,
AnotherException::class,
],
]
```
### Laravel [Section titled “Laravel”](#laravel) If you’re using [Laravel](/lib/php/integration/laravel/), Honeybadger respects the `$dontReport` property of Laravel’s [exception handler](https://laravel.com/docs/5.6/errors/#the-exception-handler) when automatically reporting exceptions during web requests. This means that any exceptions which are ignored by Laravel will also be ignored by Honeybadger. You may add other exception types to this array as needed: app/Exceptions/Handler.php
```php
/**
* A list of the exception types that should not be reported.
*
* @var array
*/
protected $dontReport = [
\Illuminate\Auth\AuthenticationException::class,
\Illuminate\Auth\Access\AuthorizationException::class,
\Symfony\Component\HttpKernel\Exception\HttpException::class,
\Illuminate\Database\Eloquent\ModelNotFoundException::class,
\Illuminate\Validation\ValidationException::class,
];
```
Keep in mind that Honeybadger will still report exceptions on this list if they are reported *outside* of Laravel’s exception handler, such as when [reporting handled exceptions](/lib/php/errors/reporting-errors#reporting-handled-exceptions/). ## Ignoring exceptions programmatically [Section titled “Ignoring exceptions programmatically”](#ignoring-exceptions-programmatically) You can use the `beforeNotify` callback to ignore exceptions programmatically. This callback is called before an exception is sent to Honeybadger. If the callback returns `false`, the exception will not be reported. For example, you can ignore exceptions based on the exception message:
```php
$honeybadger->beforeNotify(function (&$notice) {
if (strpos($notice['error']['message'], 'Ignore this exception') !== false) {
return false;
}
});
```
Or, you may modify the fingerprint of the exception to group it with other similar exceptions:
```php
$honeybadger->beforeNotify(function (&$notice) {
$notice['error']['fingerprint'] = 'MyFingerprint';
});
```
**Note**: You can register multiple `beforeNotify` callbacks. If any of them return `false`, the exception will not be reported. ### Notice properties [Section titled “Notice properties”](#notice-properties) The `$notice` parameter is an associative array that contains the following keys: * `breadcrumbs` * `enabled`: Indicates if breadcrumbs are enabled, fetched from the configuration * `trail`: The breadcrumb trail converted to an array of associative arrays, each containing: * `message`: The message of the breadcrumb * `category`: The category of the breadcrumb * `metadata`: An associative array of metadata for the breadcrumb * `timestamp`: The timestamp of the breadcrumb * `error` * `class`: The type of the exception. * `message`: The exception message. * `backtrace`: The backtrace of the exception. * `causes`: The previous exceptions in the backtrace. * `fingerprint`: A grouping identifier for the error, if provided. * `tags`: Tags associated with the error, wrapped in an array. * `request` * `cgi_data`: CGI data from the environment, or an empty object if not available. * `params`: Request parameters, or an empty object if not available. * `session`: Session data, or an empty object if not available. * `url`: The request URL. * `context`: Context data or an empty object if not available. * `component`: The component name, either from additional parameters or context. * `action`: The action name, either from additional parameters or context. * `server` * `pid`: The process ID. * `version`: The application version. * `hostname`: The hostname of the server. * `project_root`: The root directory of the project. * `environment_name`: The name of the environment. ## Disabling error reporting [Section titled “Disabling error reporting”](#disabling-error-reporting) You can disable error reporting completely by setting the `report_data` config option to false. For example, the default Laravel config has this as:
```php
'report_data' => ! in_array(env('APP_ENV'), ['local', 'testing']),
```
This means exceptions won’t be reported to Honeybadger in `local` and `testing` environments. If you want to change that, you can easily add or remove environments or set `report_data` to `true`.
# Reporting errors
> Learn how to report errors to Honeybadger in PHP applications.
Honeybadger reports uncaught exceptions automatically. In all other cases, use `$honeybadger->notify()` and `$honeybadger->customNotification()` to send errors to Honeybadger. ## Reporting unhandled exceptions [Section titled “Reporting unhandled exceptions”](#reporting-unhandled-exceptions) By default, `honeybadger-php` registers global error and exception handlers which automatically report all unhandled exceptions to Honeybadger. These handlers can be disabled via the following [configuration options](/lib/php/reference/configuration/#default-configuration):
```php
[
'handlers' => [
// Enable global exception handler
'exception' => true,
// Enable global error handler
'error' => true,
]
]
```
## Reporting handled exceptions [Section titled “Reporting handled exceptions”](#reporting-handled-exceptions) To catch an exception and notify Honeybadger without re-throwing:
```php
try {
throw new Exception('Whoops!');
} catch (Exception $e) {
$honeybadger->notify($e);
}
```
You can call `$honeybadger->notify()` anywhere in your code where you have an `Exception` to report. ### Including request data [Section titled “Including request data”](#including-request-data) You can optionally include a `\Symfony\Component\HttpFoundation\Request::class` request as the second argument to `$honeybadger->notify()`:
```php
$honeybadger->notify($e, $app->request());
```
When the request is included, HTTP information such as params, headers, and session data will be sent to Honeybadger. ## Sending custom notifications [Section titled “Sending custom notifications”](#sending-custom-notifications) To notify Honeybadger of other types of errors:
```php
$honeybadger->customNotification([
'title' => 'Special Error',
'message' => 'Special Error: a special error has occurred',
]);
```
### Options [Section titled “Options”](#options) | Option Name | Description | | ----------- | ------------------------------------------------- | | title | The title of the error (normally the class name). | | message | The error message. |
# Tracking deploys
> Learn how to use Honeybadger to track deployments in your PHP application.
Honeybadger can keep track of application deployments, and link errors to the version which the error occurred in. Here’s a simple `curl` script to record a deployment:
```sh
HONEYBADGER_ENV="production" \
HONEYBADGER_REVISION="$(git rev-parse HEAD)" \
HONEYBADGER_REPOSITORY="$(git config --get remote.origin.url)" \
HONEYBADGER_API_KEY="Your project API key" \
&& curl -g "https://api.honeybadger.io/v1/deploys?deploy[environment]=$HONEYBADGER_ENV&deploy[local_username]=$USER&deploy[revision]=$HONEYBADGER_REVISION&deploy[repository]=$HONEYBADGER_REPOSITORY&api_key=$HONEYBADGER_API_KEY"
```
Be sure that the same revision is also configured in the honeybadger-js library. Read more about deploy tracking in the [API docs](/api/deployments/). If you are using our EU stack, you should use `eu-api.honeybadger.io` instead of `api.honeybadger.io` for the `curl` command. ### Tracking deploys from Laravel Forge [Section titled “Tracking deploys from Laravel Forge”](#tracking-deploys-from-laravel-forge) If you are deploying your site with [Laravel Forge](https://forge.laravel.com), you can notify Honeybadger of deployments via Deployment Notifications. Use this format for your webhook URL: `https://api.honeybadger.io/v1/deploys/forge?api_key=YOUR_HONEYBADGER_API_KEY_HERE&environment=production` If you are using our EU stack, you should use `eu-api.honeybadger.io` instead of `api.honeybadger.io` in the webhook URL. ### Deploying with GitHub Actions [Section titled “Deploying with GitHub Actions”](#deploying-with-github-actions) If your CI/CD pipeline is hosted with GitHub Actions, you can use the [Honeybadger Deploy Action](https://github.com/marketplace/actions/honeybadger-deploy-action) to notify our API about deployments.
# Configuring check-ins
> Configure Check-Ins for PHP and Laravel applications.
Honeybadger’s PHP and Laravel packages allow configuring [Check-Ins](https://www.honeybadger.io/check-ins) via the `checkins` configuration key. Create, update or even remove check-ins for your project(s) by defining them in your configuration file. If you are using Laravel or Lumen, this should be in your `config/honeybadger.php` file.
```php
'api_key' => env('HONEYBADGER_API_KEY'),
'personal_auth_token' => env('HONEYBADGER_PERSONAL_AUTH_TOKEN'),
'checkins' => [
[
'schedule_type' => 'simple',
'name' => 'Hourly clean up',
'slug' => 'hourly-clean-up',
'grace_period' => '5 minutes',
'report_period' => '1 hour'
],
[
'schedule_type' => 'cron',
'name' => 'Hourly check',
'slug' => 'hourly-check',
'cron_schedule' => '30 * * * *',
'cron_timezone' => 'UTC'
]
]
```
## Prerequisites [Section titled “Prerequisites”](#prerequisites) ## Check-in options [Section titled “Check-in options”](#check-in-options) | Field name | Required | | --------------- | ---------------------------------------------------------- | | `name` | No. | | `slug` | Yes. This is the identifier used to synchronize check-ins. | | `schedule_type` | Yes. | | `report_period` | Only when `'schedule_type' => 'simple'`. | | `cron_schedule` | Only when `'schedule_type' => 'cron'`. | | `cron_timezone` | Only when `'schedule_type' => 'cron'`. | | `grace_period` | No. | You can find more details in the [Checkins API](/api/check-ins/) page. ## Synchronization [Section titled “Synchronization”](#synchronization) Once you have configured your check-ins, they need to be synchronized with Honeybadger. Usually you would do this as part of your deployment pipeline. If you are on Laravel or Lumen, you can do this by adding the `honeybadger:checkins:sync` command as an additional step to your deployment. Otherwise, you can manually create a script and run it:
```php
sync($config['checkins']);
```
The output of the command will print out created, updated or removed check-ins:
```shell
$ php artisan honeybadger:checkins:sync
Checkins were synchronized with Honeybadger.
+--------+---------------------------------------+---------------+--------------+-----------------+
| Id | Name | Schedule Type | Grace Period | Status |
+--------+---------------------------------------+---------------+--------------+-----------------+
| yaI6Pr | Weekly Exports | simple | 5 minutes | ✅ Synchronized |
| b3Ip54 | Hourly Notifications | simple | 5 minutes | ✅ Synchronized |
| l2Ie8Q | Hourly SMS Notifications (deprecated) | simple | 5 minutes | ❌ Removed |
+--------+---------------------------------------+---------------+--------------+-----------------+
```
### Validation [Section titled “Validation”](#validation) The synchronization process will validate the check-ins before sending them to Honeybadger. If any of the check-ins are invalid, the synchronization will fail and most probably the deployment pipeline will fail. If you want to avoid this behavior, you can ignore the result of the artisan command:
```bash
php artisan honeybadger:checkins:sync || true
```
## Troubleshooting [Section titled “Troubleshooting”](#troubleshooting) If you are receiving invalid API key errors, make sure you have set both `api_key` and `personal_auth_token` in your configuration file. If you are still receiving invalid API key errors, it is possible that you have reached your check-in limit or you are trying to create a check-in that is not supported by your plan.
# Insights overview
> Query automatic Laravel instrumentation alongside custom application events from PHP in Honeybadger Insights.
[Insights](/guides/insights/) lets you observe what your PHP application does in production. Honeybadger records common Laravel activity automatically, including incoming requests, database queries, queued jobs, mail, notifications, Redis commands, and view renders. From there, you can add context and custom events from your own code, then use [BadgerQL](/guides/insights/badgerql/) to ask questions across the whole event stream. Any field you send is queryable as soon as it arrives, with no schema to define ahead of time. ## Start with automatic instrumentation [Section titled “Start with automatic instrumentation”](#start-with-automatic-instrumentation) Enable events in `config/honeybadger.php` and the package starts recording as soon as your app boots. [Automatic instrumentation](/lib/php/insights/automatic-instrumentation/)Configure what the package captures. [Laravel event reference](/insights/event-types/laravel/)See every Laravel event type and field. ## Add a built-in dashboard [Section titled “Add a built-in dashboard”](#add-a-built-in-dashboard) Automatic events power built-in dashboards. [Laravel](/guides/dashboards/laravel/)Request and job durations, response distributions, slowest controllers and queries ## Add application context [Section titled “Add application context”](#add-application-context) Context adds fields to the current request. Once set, every event emitted during that request carries them. Say the app is A/B testing a new checkout flow against the control. Each checkout request sets context like this: Set the variant on context
```php
$honeybadger->eventContext(['checkout_variant' => $checkoutVariant]);
```
The `checkout_variant` field is now on every database event for that request. You can group by it like any other field. Database work by checkout variant
```badgerql
filter event_type::str == "db.executed" and isNotNull(checkout_variant::str)
| stats
count() as queries,
avg(duration::float) as avg_us
by checkout_variant::str
| sort queries desc
```
| queries | avg\_us | checkout\_variant | | ------- | ------- | ----------------- | | 26815 | 412 | new | | 11873 | 387 | control | The new variant ran more than twice as many queries with similar per-query time. Keep in mind that adding another A/B variant will extend any of the examples here without the need to change anything on the Honeybadger side. ## Record application events [Section titled “Record application events”](#record-application-events) Custom events record activity the framework cannot see at all. Laravel knows a checkout request ran. Only your app knows whether the payment authorized: Send a custom payment event
```php
$honeybadger->event('payment.authorized', [
'payment_provider' => $payment->provider,
'amount' => $checkout->total,
'currency' => $checkout->currency,
'authorization_id' => $payment->authorization_id,
]);
```
This query breaks down the amounts collected by variant and provider: Payments by variant and provider
```badgerql
filter event_type::str == "payment.authorized"
| stats
count() as authorizations,
sum(amount::float) as authorized_amount
by checkout_variant::str, payment_provider::str
| sort authorized_amount desc
```
| authorizations | authorized\_amount | checkout\_variant | payment\_provider | | -------------- | ------------------ | ----------------- | ----------------- | | 413 | 34108.00 | new | stripe | | 218 | 18722.00 | new | paypal | | 418 | 32167.00 | control | stripe | | 220 | 13639.00 | control | paypal | [Sending custom events](/lib/php/insights/sending-events-to-insights/)The full event API.
# Automatic instrumentation
> Events the Honeybadger Laravel package captures automatically for Honeybadger Insights.
If you’re using Laravel or Lumen, Honeybadger provides automatic instrumentation to capture events from your apps. By default, we’ll record: * [Log events](https://laravel.com/docs/logging) * [View renders](https://laravel.com/docs/views) * [Email dispatches](https://laravel.com/docs/mail) * [Job dispatches](https://laravel.com/docs/queues) * [Notification dispatches](https://laravel.com/docs/notifications) * [Database queries](https://laravel.com/docs/queries) * [Redis commands](https://laravel.com/docs/redis) * Incoming requests See the [Laravel event reference](/insights/event-types/laravel/) for every event the package emits, with field schemas and types. You can customise this with the `events` option in your `config/honeybadger.php`:
```php
'events' => [
'enabled' => true,
'automatic' => [
Events\DatabaseQueryExecuted::class,
Events\DatabaseTransactionStarted::class,
Events\DatabaseTransactionCommitted::class,
Events\DatabaseTransactionRolledBack::class,
Events\CacheHit::class,
Events\CacheMiss::class,
Events\JobQueued::class,
Events\MailSending::class,
Events\MailSent::class,
Events\MessageLogged::class,
Events\NotificationSending::class,
Events\NotificationSent::class,
Events\NotificationFailed::class,
Events\RedisCommandExecuted::class,
Events\RouteMatched::class,
Events\ViewRendered::class,
],
],
```
The `events.automatic` key contains the list of the events Honeybadger tracks by default. You can disable a specific event by removing or commenting out the appropriate line. ## Managing event volume [Section titled “Managing event volume”](#managing-event-volume) If some events are noisy or you’d like to reduce quota consumption: * [Filtering events](/lib/php/insights/filtering-events/) — inspect, modify, or drop events with a callback. * [Sampling events](/lib/php/insights/sampling-events/) — send only a percentage of events. ## Sending your own events [Section titled “Sending your own events”](#sending-your-own-events) Automatic instrumentation covers the framework events the package knows about. To send your own application events, see [Sending custom events](/lib/php/insights/sending-events-to-insights/).
# Capturing logs
> Send application logs from PHP and Laravel applications to Honeybadger Insights.
You can send your application logs to Insights either by sending them to Honeybadger from your [infrastructure](/guides/insights/integrations/log-files/) **or** if you are using Monolog, you can register Honeybadger’s `LogEventHandler` class as a handler:
```php
$logger = new Monolog\Logger('my-logger');
$honeybadger = Honeybadger\Honeybadger::new([
'api_key' => 'my-api-key'
]);
$logger->pushHandler(new Honeybadger\LogEventHandler($honeybadger));
$logger->info('An info message');
$logger->info('An info message with context data', ["some-key" => "some-value"]);
$logger->error('An error message');
```
You can send an optional second argument to the `LogEventHandler` constructor to specify the minimum log level to be sent to Honeybadger. The default is `Monolog\Logger::INFO`.
```php
new Honeybadger\LogEventHandler($honeybadger, Monolog\Logger::DEBUG);
```
This will send all log messages to Insights, where they will be displayed in the [Insights](https://www.honeybadger.io/tour/logging-observability) section of your dashboard. ## Using Laravel or Lumen [Section titled “Using Laravel or Lumen”](#using-laravel-or-lumen) If you are using Laravel or Lumen, [register a custom channel](https://laravel.com/docs/11.x/logging#creating-custom-channels-via-factories) in your `config/logging.php`, making use of the `HoneybadgerLogEventDriver`: config/logging.php
```php
'channels' => [
// ...
'honeybadger' => [
'driver' => 'custom',
'via' => Honeybadger\HoneybadgerLaravel\HoneybadgerLogEventDriver::class,
'name' => 'honeybadger',
'level' => 'info',
],
],
```
Now you can write log messages as normal with Laravel’s log facade, and they’ll show up in Honeybadger Insights:
```php
Log::channel('honeybadger')->info('An info message');
Log::channel('honeybadger')->error('An error message with context', ["some-key" => "some-value"]);
```
Add this custom channel to your default stack and voilà, all your log messages will appear in Honeybadger Insights: config/logging.php
```php
'channels' => [
'stack' => [
'driver' => 'stack',
'channels' => ['single', 'honeybadger'],
'ignore_exceptions' => false,
],
// ...
],
```
# Filtering events
> Ignore or modify events before they're sent from your PHP application to Honeybadger Insights.
You can ignore events programmatically using the `beforeEvent` callback. This callback is called before an event is sent to Honeybadger. If the callback returns `false`, the event will not be sent. For example, you can ignore events based on the event type:
```php
$honeybadger->beforeEvent(function (&$event) {
if ($event['event_type'] === 'user_activity' && $event['action'] === 'registration') {
return false;
}
});
```
Or, you may modify the event data before it is sent:
```php
$honeybadger->beforeEvent(function (&$event) {
$event['user_id'] = 456;
});
```
**Note**: You can register multiple `beforeEvent` callbacks. If any of them return `false`, the event will not be sent. ## Sampling events [Section titled “Sampling events”](#sampling-events) If you’d rather reduce event volume across the board instead of ignoring specific events, see [Sampling events](/lib/php/insights/sampling-events/).
# Sampling events
> Send a percentage of events from your PHP application to Honeybadger Insights to manage quota consumption.
If you find that you’d like to report fewer events in order to minimize your quota consumption, you can update your configuration in `config/honeybadger.php` to conditionally send a certain percentage of events:
```php
'events' => [
'enabled' => true,
'sample_rate' => 10
]
```
This will send 10% of events not associated with a request, and all events for 10% of requests. To ignore specific events instead of sampling across the board, see [Filtering events](/lib/php/insights/filtering-events/).
# Sending custom events
> Send custom events from PHP applications to Honeybadger Insights for monitoring and analysis.
You can send your own application events to [Honeybadger Insights](/guides/insights/) with Honeybadger’s PHP (v2.19+) and Laravel (v4.1+) packages. (For the events the Laravel package captures on its own, see [Automatic instrumentation](/lib/php/insights/automatic-instrumentation/); to forward application logs, see [Capturing logs](/lib/php/insights/capturing-logs/).) Start by configuring Honeybadger and enabling events:
```php
$honeybadger = Honeybadger\Honeybadger::new([
'api_key' => 'my-api-key',
'events' => [
'enabled' => true
]
]);
```
Then you can send events using the `$honeybadger->event` method:
```php
$honeybadger->event('user_activity', [
'action' => 'registration',
'user_id' => 123
])
```
The first argument is the type of the event (`event_type`) and the second argument is an object containing any additional data you want to include. `$honeybadger->event` can also be called with a single argument as an object containing the data for the event:
```php
$honeybadger->event([
'event_type' => 'user_activity',
'action' => 'registration',
'user_id' => 123
])
```
A timestamp field (`ts`) will be automatically added to the event data if it is not provided, regardless of the method used to send the event. These events may be found using the following BadgerQL query:
```badgerql
fields @ts, @preview
| filter event_type::str == "user_activity"
| filter action::str == "registration"
| sort @ts
```
## Managing event volume [Section titled “Managing event volume”](#managing-event-volume) If some events are noisy or you’d like to reduce quota consumption: * [Filtering events](/lib/php/insights/filtering-events/) — inspect, modify, or drop events with a callback. * [Sampling events](/lib/php/insights/sampling-events/) — send only a percentage of events.
# Laravel integration guide
> Honeybadger monitors your Laravel applications for errors and exceptions so that you can fix them wicked fast.
**Typical installation time:** 5 minutes Hi there! You’ve found Honeybadger’s guide to **Laravel error and exception tracking**. Once installed, Honeybadger will automatically report errors wherever they may happen: * During a web request * In a scheduled command * In a background task * When a process crashes ## Installation [Section titled “Installation”](#installation) First, install the [honeybadger-laravel](https://github.com/honeybadger-io/honeybadger-laravel) package via composer:
```bash
composer require honeybadger-io/honeybadger-laravel
```
### Laravel version support [Section titled “Laravel version support”](#laravel-version-support) Install the version of our package based on the version of Laravel and PHP you are using. | Laravel | PHP version | Honeybadger Laravel version | | ------- | ----------- | ----------------------------------------------------------------------------------------------------------------------------------------------------------------------------------------- | | 12.x | 8.2+ | [5.x (current)](https://github.com/honeybadger-io/honeybadger-laravel/releases) | | 11.x | 8.2+ | [5.x (current)](https://github.com/honeybadger-io/honeybadger-laravel/releases) | | 10.x | 8.1+ | [5.x (current)](https://github.com/honeybadger-io/honeybadger-laravel/releases); [4.7.1](https://github.com/honeybadger-io/honeybadger-laravel/releases?q=v4.\&expanded=true) if PHP ≤8.1 | | 9.x | 8.0 – 8.2 | [3.13.x](https://github.com/honeybadger-io/honeybadger-laravel/releases/tag/v3.18.2) | | 8.x | 7.3 – 8.1 | [3.2.x](https://github.com/honeybadger-io/honeybadger-laravel/releases/tag/v3.18.2) | | 7.x | 7.2.5 – 8.0 | [3.x](https://github.com/honeybadger-io/honeybadger-laravel/releases/tag/v3.18.2) | | 6.x | 7.2.5 – 8.0 | [2.1](https://github.com/honeybadger-io/honeybadger-laravel/releases/tag/v2.1.0) | | 5.x | 7.0 – 7.3 | [1.x](https://github.com/honeybadger-io/honeybadger-laravel/releases/tag/v1.7.3) | *** *** Next, add Honeybadger reporting to Laravel 11 and later by adding the following to `bootstrap/app.php` (): bootstrap/app.php
```php
->withExceptions(function (Exceptions $exceptions) {
$exceptions->report(static function (Throwable $e) {
if (app()->bound('honeybadger')) {
app('honeybadger')->notify($e, app('request'));
}
});
})
```
In Laravel 8.5 to 10, the default handler comes with a [`register()` method](https://laravel.com/docs/10.x/errors#reporting-exceptions); you should add the Honeybadger client within the `reportable()` callback. app/Exceptions/Handler.php
```php
public function register()
{
$this->reportable(function (Throwable $e) {
if (app()->bound('honeybadger')) {
app('honeybadger')->notify($e, app('request'));
}
});
}
```
On earlier versions of Laravel, add the client within the `report($exception)` method:
```php
public function report(Throwable $exception)
{
if (app()->bound('honeybadger') && $this->shouldReport($exception)) {
app('honeybadger')->notify($exception, app('request'));
}
parent::report($exception);
}
```
Finally, run the `honeybadger:install` artisan command.
```bash
php artisan honeybadger:install [Your project API key]
```
If you are using our EU stack, add the `--endpoint` and the `--appEndpoint` flags to the `honeybadger:install` command:
```bash
php artisan honeybadger:install [Your project API key] --endpoint=https://eu-api.honeybadger.io --appEndpoint=https://eu-app.honeybadger.io
```
The `honeybadger:install` command does three things: 1. Adds `HONEYBADGER_API_KEY` to `.env` and `.env.example` 2. If you added the `--endpoint` and `--appEndpoint` flags, it also adds `HONEBADGER_ENDPONT` and `HONEYBADGER_APP_ENDPOINT` to `.env` and `.env.example`. 3. Creates Honeybadger’s `config/honeybadger.php` configuration file 4. Sends a test notification to your Honeybadger project If everything is set up correctly, you should now have an error report in Honeybadger! ## Identifying users and controller/action [Section titled “Identifying users and controller/action”](#identifying-users-and-controlleraction) Honeybadger automatically captures details about the current logged-in user, as well as the controller and method name. No extra configuration needed. We only capture the user ID, so no sensitive information is transmitted. When an error occurs, you’ll see an **Affected Users** section on your dashboard, where we’ll list the user IDs and how many times they encountered the error. ## Adding context [Section titled “Adding context”](#adding-context) [Context](/lib/php/errors/customizing-error-reports/) can be added by either the provided Facade or by resolving from the service container. ### Facade [Section titled “Facade”](#facade)
```php
Honeybadger::context('key', $value);
```
### DI resolution [Section titled “DI resolution”](#di-resolution)
```php
use Honeybadger\Honeybadger;
public function __construct(Honeybadger $honeybadger)
{
$honeybadger->context('key', $value);
}
```
### Helper resolution [Section titled “Helper resolution”](#helper-resolution)
```php
use Honeybadger\Honeybadger;
public function __construct()
{
app('honeybadger')->context('key', $value);
app(Honeybadger::class)->context('key', $value)
}
```
## Check-Ins [Section titled “Check-Ins”](#check-ins) `honeybadger-laravel` integrates with [Honeybadger’s Check-In feature](https://www.honeybadger.io/check-ins) to help you know when your scheduled tasks and background jobs go missing or silently fail. To get started, create a new check-in in the Check-Ins tab of your project dashboard. You’ll be given a check-in URL that looks like this: . Take note of the check-in ID; it’s the last part of the check-in URL. In this example, it’s **Jiy63Xw**. Alternatively, you can setup your [check-ins entirely within your configuration file](/lib/php/guides/configuring-checkins/). If you follow this method, you don’t need the check-in ID anymore and instead you can use the check-in slug. #### Run a one-off check-in [Section titled “Run a one-off check-in”](#run-a-one-off-check-in) To run a one-off check-in, use the `honeybadger:checkin` command with your check-in ID. This will let Honeybadger know that your app is alive.
```bash
php artisan honeybadger:checkin Jiy63Xw
```
Or if you have configured your check-ins in your configuration file:
```bash
php artisan honeybadger:checkin "my-checkin"
```
#### Scheduled command [Section titled “Scheduled command”](#scheduled-command) You can schedule the check-in command to run at an interval. This method is great for ensuring your application is up and running. app/Console/Kernel.php
```php
protected function schedule(Schedule $schedule)
{
$schedule->command('honeybadger:checkin Jiy63Xw')->everyFiveMinutes();
// or using the check-in slug
$schedule->command('honeybadger:checkin "my-checkin"')->everyFiveMinutes();
}
```
#### After a scheduled command [Section titled “After a scheduled command”](#after-a-scheduled-command) You can use the `thenPingHoneybadger($checkInId)` macro to check-in after certain scheduled commands are run. This method is great for making sure specific scheduled commands are running on time. app/Console/Kernel.php
```php
protected function schedule(Schedule $schedule)
{
$schedule->command(SendEmails::class)->daily()
->thenPingHoneybadger('Jiy63Xw');
// or using the check-in slug
->thenPingHoneybadger('my-checkin');
}
```
In this example, if `SendEmails` fails to run for some reason, Honeybadger will notify you. You can also specify the environments where the check-in is allowed to run: app/Console/Kernel.php
```php
protected function schedule(Schedule $schedule)
{
$schedule->command(SendEmails::class)->daily()
->thenPingHoneybadger('Jiy63Xw', 'production');
// or using the check-in slug
->thenPingHoneybadger('my-checkin', 'production');
$schedule->command(CheckStatus::class)->daily()
->thenPingHoneybadger('Jiy63Xw', ['production', 'staging']);
// or using the check-in slug
->thenPingHoneybadger('my-checkin', ['production', 'staging']);
}
```
#### After a successful scheduled command [Section titled “After a successful scheduled command”](#after-a-successful-scheduled-command) You can use the `pingHoneybadgerOnSuccess($checkInId)` macro to ensure that a certain command was run and completed successfully. This method is great for making sure specific scheduled commands are running on time **only if it was successful**. Like the `thenPingHoneybadger` method, you can also restrict it to specific environments. app/Console/Kernel.php
```php
protected function schedule(Schedule $schedule)
{
$schedule->command(SendEmails::class)->daily()
->pingHoneybadgerOnSuccess('Jiy63Xw', 'production');
// or using the check-in slug
->pingHoneybadgerOnSuccess('my-checkin', 'production');
}
```
## Using Honeybadger as a logger [Section titled “Using Honeybadger as a logger”](#using-honeybadger-as-a-logger) If you prefer, you can also use Honeybadger as a log channel in your Laravel app. To do this, you’ll need to [register a custom channel](https://laravel.com/docs/11.x/logging#creating-custom-channels-via-factories) in your `config/logging.php`, making use of the `HoneybadgerLogDriver`: config/logging.php
```php
'channels' => [
// ...
'honeybadger' => [
'driver' => 'custom',
'via' => Honeybadger\HoneybadgerLaravel\HoneybadgerLogDriver::class,
'name' => 'honeybadger',
'level' => 'error',
],
],
```
Now you can write log messages as normal with Laravel’s log facade, and they’ll show up on your Honeybadger dashboard.
```php
Log::channel('honeybadger')->error('An error message');
Log::channel('honeybadger')->error('An error message with context', ["some-key" => "some-value"]);
Log::channel('honeybadger')->error($exception);
```
If you include an `exception` context item in your error messages, we’ll automatically format them for easy viewing:
```php
$e = new \Exception('Something happened');
Log::channel('honeybadger')->error('An error message', ['exception' => $e]);
```
You can also add the custom channel to your default stack so you can automatically have exceptions logged to Honeybadger as well: config/logging.php
```php
'channels' => [
'stack' => [
'driver' => 'stack',
'channels' => ['single', 'honeybadger'],
'ignore_exceptions' => false,
],
// ...
],
```
# Manual Laravel integration
> Learn how to manually integrate Honeybadger with older Laravel versions or when package discovery is disabled.
The [`honeybadger-laravel` package](https://github.com/honeybadger-io/honeybadger-laravel) uses Laravel’s [package discovery](https://laravel.com/docs/5.6/packages#package-discovery) to register the service provider and facade to the framework. If you are using an older version of Laravel or do not use package discovery see below. ### Step 1: Register the provider with the framework [Section titled “Step 1: Register the provider with the framework”](#step-1-register-the-provider-with-the-framework) config/app.php
```php
'providers' => [
/*
* Package Service Providers...
*/
\Honeybadger\HoneybadgerLaravel\HoneybadgerServiceProvider::class,
]
```
### Step 2: Register the facade with the framework [Section titled “Step 2: Register the facade with the framework”](#step-2-register-the-facade-with-the-framework) config/app.php
```php
'aliases' => [
'Honeybadger' => \Honeybadger\HoneybadgerLaravel\Facades\Honeybadger::class,
]
```
# Lumen integration guide
> Honeybadger monitors your Lumen applications for errors and exceptions so that you can fix them wicked fast.
**Typical installation time:** 5 minutes Hi there! You’ve found Honeybadger’s guide to **Lumen error and exception tracking**. Once installed, Honeybadger will automatically report errors wherever they may happen: * During a web request * In a scheduled command * In a background task * When a process crashes ## Installation [Section titled “Installation”](#installation) First, install the [honeybadger-laravel](https://github.com/honeybadger-io/honeybadger-laravel) package via composer:
```bash
composer require honeybadger-io/honeybadger-laravel
```
…and add the following line to `bootstrap/app.php` under the “Register Service Providers” section:
```php
$app->register(\Honeybadger\HoneybadgerLaravel\HoneybadgerServiceProvider::class);
```
Next, add Honeybadger reporting to `app/Exceptions/Handler.php`:
```php
public function report(Exception $exception)
{
if (app()->bound('honeybadger') && $this->shouldReport($exception)) {
app('honeybadger')->notify($exception, app('request'));
}
parent::report($exception);
}
```
Finally, run the `honeybadger:install` artisan command:
```bash
php artisan honeybadger:install [Your project API key]
```
The `honeybadger:install` command does three things: 1. Adds `HONEYBADGER_API_KEY` to `.env` and `.env.example` 2. Creates Honeybadger’s `config/honeybadger.php` configuration file 3. Sends a test notification to your Honeybadger project If everything is set up correctly, you should now have an error report in Honeybadger! ## Identifying users [Section titled “Identifying users”](#identifying-users) Honeybadger automatically captures details about the current logged-in user, as well as the controller and method name. No extra configuration needed. We only capture the user ID, so no sensitive information is transmitted. When an error occurs, you’ll see an **Affected Users** section on your dashboard, where we’ll list the user IDs and how many times they encountered the error. ## Adding context [Section titled “Adding context”](#adding-context) [Context](/lib/php/errors/customizing-error-reports/) can be added by either the provided Facade or by resolving from the service container. ### Facade [Section titled “Facade”](#facade)
```php
Honeybadger::context('key', $value);
```
### DI resolution [Section titled “DI resolution”](#di-resolution)
```php
use Honeybadger\Honeybadger;
public function __construct(Honeybadger $honeybadger)
{
$honeybadger->context('key', $value);
}
```
### Helper resolution [Section titled “Helper resolution”](#helper-resolution)
```php
use Honeybadger\Honeybadger;
public function __construct()
{
app('honeybadger')->context('key', $value);
app(Honeybadger::class)->context('key', $value)
}
```
## Using Honeybadger as a logger [Section titled “Using Honeybadger as a logger”](#using-honeybadger-as-a-logger) If you prefer, you can also use Honeybadger as a log channel in your Lumen app. To do this, you’ll need to [register a custom channel](https://laravel.com/docs/logging#creating-custom-channels-via-factories) in your `config/logging.php`, making use of the `HoneybadgerLogDriver`. If you don’t have a `config/logging.php` file, you can create one by copying the contents of the one [embedded in Lumen](https://github.com/laravel/lumen-framework/blob/8.x/config/logging.php). Once you’ve done that, you can add a custom channel called “honeybadger”: config/logging.php
```php
'channels' => [
// ...
'honeybadger' => [
'driver' => 'custom',
'via' => Honeybadger\HoneybadgerLaravel\HoneybadgerLogDriver::class,
'name' => 'honeybadger'
],
],
```
Now you can write log messages as normal with Lumen’s log facade, and they’ll show up on your Honeybadger dashboard.
```php
Log::channel('honeybadger')->info('An info message');
Log::channel('honeybadger')->('An info message with context data', ["some-key" => "some-value"]);
Log::channel('honeybadger')->error('An error message');
```
If you include an `exception` context item in your error messages, we’ll automatically format them for easy viewing:
```php
$e = new \Exception('Something happened');
Log::channel('honeybadger')->error('An error message', ['exception' => $e]);
```
You can also add the custom channel to your default stack so you can automatically have exceptions logged to Honeybadger as well: config/logging.php
```php
'channels' => [
'stack' => [
'driver' => 'stack',
'channels' => ['single', 'honeybadger'],
'ignore_exceptions' => false,
],
// ...
],
```
# PHP integration guide
> Honeybadger monitors your PHP applications for errors and exceptions so that you can fix them wicked fast.
**Typical installation time:** 3 minutes Hi there! You’ve found Honeybadger’s guide to **PHP exception and error tracking**. Note: if you use **Laravel**, go check out the **[Laravel Integration Guide](/lib/php/integration/laravel/)**. If not, then read on! This guide will teach you how to install and configure the default **Honeybadger for PHP** client and use it to manually [report errors to Honeybadger](/lib/php/errors/reporting-errors/). ## Installation [Section titled “Installation”](#installation) First, install the [honeybadger-php](https://github.com/honeybadger-io/honeybadger-php) package via composer:
```bash
composer require honeybadger-io/honeybadger-php
```
Then, configure the Honeybadger client in your application:
```php
$honeybadger = Honeybadger\Honeybadger::new([
'api_key' => 'PROJECT_API_KEY'
]);
```
Honeybadger can report exceptions in several ways. To test that the Honeybadger client is working, try sending a custom notification:
```php
$honeybadger->customNotification([
'title' => 'Special Error',
'message' => 'Special Error: a special error has occurred',
]);
```
To catch exceptions in your code and report them to Honeybadger:
```php
try {
throw new Exception('Whoops!');
} catch (Exception $e) {
// You can optionally include your own
// \Symfony\Component\HttpFoundation\Request::class request.
$honeybadger->notify($e, $app->request());
}
```
## Adding context [Section titled “Adding context”](#adding-context) In Honeybadger, **context** is a custom array of data that’s displayed with your error reports. You can add context from anywhere in your app, and it will be included automatically when reporting errors. For example, you could include the ID of the currently logged-in user:
```php
$honeybadger->context('user_id', $this->Auth->user('id'));
```
See [Customizing Error Reports](/lib/php/errors/customizing-error-reports/) for more info. ## Handling service exceptions [Section titled “Handling service exceptions”](#handling-service-exceptions) When the client is unable to send a report to Honeybadger’s service, it will throw an instance of `\Honeybadger\Exceptions\ServiceException`. To prevent this from crashing your app and hiding the original error, you can set the `service_exception_handler` option to a closure where you can handle the exception yourself:
```php
$honeybadger = Honeybadger\Honeybadger::new([
'api_key' => 'PROJECT_API_KEY',
'service_exception_handler' => function (ServiceException $e) {
$logger->error($e);
},
]);
```
## Using Honeybadger as a logger [Section titled “Using Honeybadger as a logger”](#using-honeybadger-as-a-logger) If you’re using the PHP logging library [Monolog](https://github.com/Seldaek/monolog) in your app, you can also choose to use Honeybadger as a log handler, by using the `LogHandler` class. Then write log messages as normal with Monolog, and they’ll show up on your Honeybadger dashboard.
```php
$logger = new Monolog\Logger('my-logger');
$honeybadger = Honeybadger\Honeybadger::new([
'api_key' => 'my-api-key'
]);
$logger->pushHandler(new Honeybadger\LogHandler($honeybadger));
$logger->info('An info message');
$logger->info('An info message with context data', ["some-key" => "some-value"]);
$logger->error('An error message');
```
If you include an `exception` context item in your error messages, we’ll automatically format them for easy viewing:
```php
$e = new \Exception('Something happened');
$logger->error('An error message', ['exception' => $e]);
```
# WordPress integration guide
> Honeybadger monitors your WordPress sites for errors and exceptions so that you can fix them quickly.
**Typical installation time:** 5 minutes Hi there! You’ve found Honeybadger’s guide to **WordPress error and exception tracking**. Once installed, Honeybadger will automatically report errors wherever they may happen, both in the front-end (JavaScript) and back-end (PHP) of your WordPress site. ## Installation [Section titled “Installation”](#installation) First, install the [Honeybadger Application Monitoring](https://wordpress.org/plugins/honeybadger-application-monitoring) plugin via the WordPress plugin repository: 1. In your WordPress admin panel, go to **Plugins** > **Add New**. 2. Search for “Honeybadger Application Monitoring”. 3. Click **Install Now** next to the Honeybadger plugin. 4. After installation, click **Activate**. Alternatively, you can install the plugin manually: 1. Download the plugin from the [WordPress plugin repository](https://wordpress.org/plugins/honeybadger-application-monitoring). 2. Upload the plugin files to the `/wp-content/plugins/honeybadger-application-monitoring` directory. 3. Activate the plugin through the **Plugins** page in WordPress. ## Configuration [Section titled “Configuration”](#configuration) After activating the plugin, you need to configure it with your Honeybadger API key(s): 1. In your WordPress admin panel, go to **Settings** > **Honeybadger**. 2. Grab your API key(s) from your Honeybadger project settings. It is recommended that you have two separate projects, one for PHP and another for JavaScript error tracking. 3. Enter your Honeybadger API key(s) in the **PHP API Key** and **JS API Key** fields. 4. Ensure that **PHP error reporting enabled** is checked if you want to track PHP errors, as well as **JS error reporting enabled** if you want to track JavaScript errors. 5. (Optional) You can also configure the **Environment** and **Version** settings to better track your errors. 6. Click **Save Changes**. ## Testing the integration [Section titled “Testing the integration”](#testing-the-integration) To ensure everything is set up correctly, you can trigger a test error: 1. In your WordPress admin panel, go to **Settings** > **Honeybadger**. 2. Check the **Send test notification from PHP** or **Send test notification from JS** checkboxes. 3. Click **Save Changes**. If everything is set up correctly, you should now have an error (or two if you checked both checkboxes) reported in Honeybadger!
# Configuration
> Configuration options for Honeybadger PHP and Laravel packages.
There are several ways to configure Honeybadger. See [Default Configuration](#default-configuration) for all the options that are available. ## Creating a new client [Section titled “Creating a new client”](#creating-a-new-client) In any PHP app, you can configure a new Honeybadger client directly via its constructor function:
```php
$honeybadger = Honeybadger\Honeybadger::new([
'api_key' => 'PROJECT_API_KEY'
]);
```
Using Honeybadger this way is good for creating custom integrations or adding Honeybadger to frameworks which don’t have an official integration yet. ## Laravel/Lumen [Section titled “Laravel/Lumen”](#laravellumen) In [Laravel](/lib/php/integration/laravel/) and [Lumen](/lib/php/integration/lumen/) apps, you should add your configuration to `config/honeybadger.php` instead. In addition to the [default configuration](#default-configuration) below, you can also define the [`middleware`](https://github.com/honeybadger-io/honeybadger-laravel/blob/master/config/honeybadger.php) option to enable or disable middleware that are automatically registered by the package. For example, the [`AssignRequestId`](https://github.com/honeybadger-io/honeybadger-laravel/blob/master/src/Middleware/AssignRequestId.php) middleware is registered by default, which assigns a unique request ID to each request. If you already have a way to assign request IDs in your app, you can disable this middleware. ## Default configuration [Section titled “Default configuration”](#default-configuration) The default configuration options are shown below:
```php
[
// Honeybadger API Key
'api_key' => null,
// Personal authentication token (needed to synchronize checkins from this configuration file)
'personal_auth_token' => null,
// The application environment
'environment_name' => 'production',
// To disable exception reporting, set this to false (or an expression that returns false).
'report_data' => ! in_array(env('APP_ENV'), ['local', 'testing']),
'environment' => [
// Environment keys to filter before the payload sent to Honeybadger (see Environment Whitelist)
'filter' => [],
// Additional environment keys to include (see Environment Whitelist)
'include' => [],
],
'request' => [
// Request keys to filter before the payload sent to Honeybadger
'filter' => [
'password',
'password_confirmation'
],
],
// Application version
'version' => '',
// System hostname
'hostname' => gethostname(),
// Project root (/var/www)
'project_root' => '',
'handlers' => [
// Enable global exception handler
'exception' => true,
// Enable global error handler
'error' => true,
// Enable global shutdown handler
'shutdown' => true,
],
// Configure the underlying Guzzle client used
'client' => [
// Request timeout in seconds (default: 15s)
'timeout' => 15,
// Request proxy settings
'proxy' => [
// Use this proxy with 'http' (tcp://username:password@localhost:8125)
'http' => '',
// Use this proxy with 'https' (tcp://username:password@localhost:8125)
'https' => '',
],
],
// Specify a custom endpoint
'endpoint' => 'https://api.honeybadger.io',
// Exclude exceptions from being reported
'excluded_exceptions' => [],
// Enable reporting deprecation warnings.
'capture_deprecations' => false,
// Specify how failures to reach Honeybadger should be handled
'service_exception_handler' => function (\Honeybadger\Exceptions\ServiceException $e) {
throw $e;
},
// Enable breadcrumbs
'breadcrumbs' => [
'enabled' => true,
],
// Define your checkins here and synchronize them to Honeybadger
'checkins' => [],
// Configure Insights events reporting
'events' => [
'enabled' => false,
'bulk_threshold' => BulkEventDispatcher::BULK_THRESHOLD,
'dispatch_interval_seconds' => BulkEventDispatcher::DISPATCH_INTERVAL_SECONDS,
'sample_rate' => 100 // Percentage of events to send
],
]
```
## Environment whitelist [Section titled “Environment whitelist”](#environment-whitelist) All keys beginning with `HTTP_` are reported by default, as well as the following whitelisted keys:
```plaintext
'PHP_SELF'
'argv'
'argc'
'GATEWAY_INTERFACE'
'SERVER_ADDR'
'SERVER_NAME'
'SERVER_SOFTWARE'
'SERVER_PROTOCOL'
'REQUEST_METHOD'
'REQUEST_TIME'
'REQUEST_TIME_FLOAT'
'QUERY_STRING'
'DOCUMENT_ROOT'
'HTTPS'
'REMOTE_ADDR'
'REMOTE_HOST'
'REMOTE_PORT'
'REMOTE_USER'
'REDIRECT_REMOTE_USER'
'SCRIPT_FILENAME'
'SERVER_ADMIN'
'SERVER_PORT'
'SERVER_SIGNATURE'
'PATH_TRANSLATED'
'SCRIPT_NAME'
'REQUEST_URI'
'PHP_AUTH_DIGEST'
'PHP_AUTH_USER'
'PHP_AUTH_PW'
'AUTH_TYPE'
'PATH_INFO'
'ORIG_PATH_INFO'
'APP_ENV'
```
## Exceptions [Section titled “Exceptions”](#exceptions) If there is an error contacting Honeybadger a `\Honeybadger\Exceptions\ServiceException::class` will be thrown with a relevant exception message.
# Supported versions
> Supported PHP versions for Honeybadger packages.
## honeybadger-php [Section titled “honeybadger-php”](#honeybadger-php) The [honeybadger-php](https://github.com/honeybadger-io/honeybadger-php) package supports **PHP 7.3+**. Use the [latest release](https://github.com/honeybadger-io/honeybadger-php/releases?q=\&expanded=true) for current support. ## honeybadger-laravel [Section titled “honeybadger-laravel”](#honeybadger-laravel) For supported Laravel and PHP version combinations and which Honeybadger Laravel package version to install, see the [Laravel version support](/lib/php/integration/laravel/#laravel-version-support) table in the [Laravel integration guide](/lib/php/integration/laravel/).
# Frequently asked questions
> Common questions about Honeybadger for PHP.
Don’t see your question here? See [Getting Support](/lib/php/#getting-support) for next steps. ### How do I ignore certain errors? [Section titled “How do I ignore certain errors?”](#how-do-i-ignore-certain-errors) See [Reducing Noise](/lib/php/errors/reducing-noise/). ### How do I remove sensitive params or other data from error reports? [Section titled “How do I remove sensitive params or other data from error reports?”](#how-do-i-remove-sensitive-params-or-other-data-from-error-reports) See [Filtering Sensitive Data](/lib/php/errors/filtering-sensitive-data/).
# Troubleshooting
> Common issues and workarounds for Honeybadger PHP packages.
Common issues/workarounds for [`honeybadger-php`](https://github.com/honeybadger-io/honeybadger-php) and [`honeybadger-laravel`](https://github.com/honeybadger-io/honeybadger-laravel) are documented here. If you don’t find a solution to your problem here or in our [support documentation](/lib/php/#getting-support), email and we’ll assist you! ## Before you start troubleshooting [Section titled “Before you start troubleshooting”](#before-you-start-troubleshooting) 1. Make sure you are on the latest version of [honeybadger-php](https://packagist.org/packages/honeybadger-io/honeybadger-php) and/or [honeybadger-laravel](https://packagist.org/packages/honeybadger-io/honeybadger-laravel). ### All errors are not reported [Section titled “All errors are not reported”](#all-errors-are-not-reported) If *no* errors are reported (even [manually via `$honeybadger->notify()`](/lib/php/errors/reporting-errors/)): 1. [Is the `api_key` config option configured?](/lib/php/reference/configuration/) 2. [Is `report_data` set to `false`?](/lib/php/errors/reducing-noise/) ### Some errors are not reported [Section titled “Some errors are not reported”](#some-errors-are-not-reported) 1. [Is the error ignored via config?](/lib/php/errors/reducing-noise/) ### Function call arguments aren’t shown in the backtrace [Section titled “Function call arguments aren’t shown in the backtrace”](#function-call-arguments-arent-shown-in-the-backtrace) 1. [Is `zend.exception_ignore_args` set to “Off”?](/lib/php/errors/capturing-function-call-arguments/)