Deployments
Deployment tracking lets you record when your app is deployed, see a history of deployments, and correlate code changes with errors. When you deploy, Honeybadger can automatically resolve open errors and notify your team.
The Deployments page
Section titled “The Deployments page”Your most recent deployments are listed on your project’s Deployments page, sorted by timestamp with the newest first. You can also filter by environment and adjust the time range, with presets for month to date, the last seven days, and yesterday.
For each deployment, Honeybadger displays the timestamp, environment, deploying user, and revision. When GitHub or GitLab is connected, Honeybadger links the revision to a comparison page that shows a diff of what changed since the last deploy.
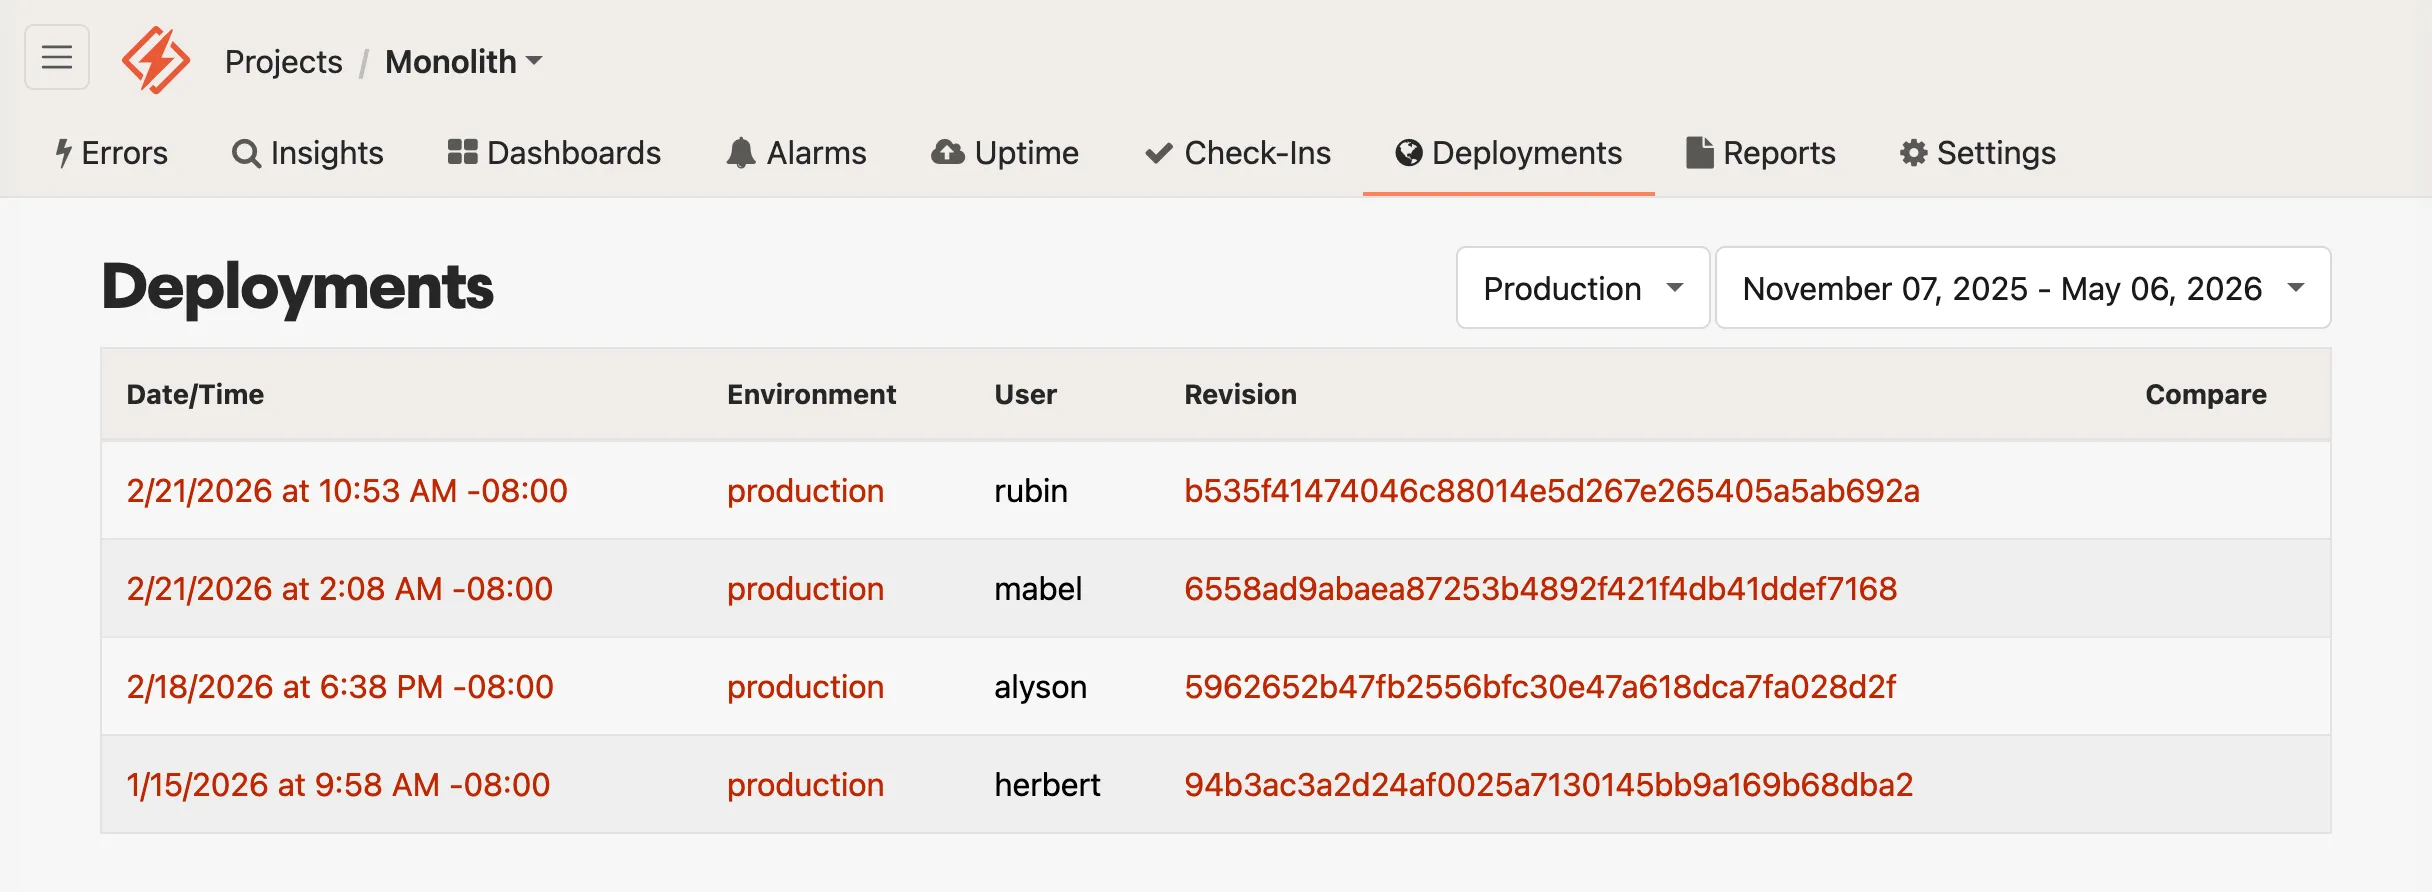
If your app is on Heroku, the user field shows which Heroku component triggered the deployment.
Auto-resolving errors on deploy
Section titled “Auto-resolving errors on deploy”By default, all unresolved errors are automatically marked as resolved when a deployment is recorded, which helps keep your error list clean. If a resolved error re-occurs after a deploy, you will receive a new notification to let you know the error is still happening.
Auto-resolving assumes you fix errors between deploys (or at least want to be reminded about errors frequently). To disable auto-resolve, uncheck Resolve errors on deploy in your project’s settings.
When disabled, you can still mark individual errors to resolve on the next deploy on the error page.
Searching with deployments
Section titled “Searching with deployments”Honeybadger’s error search supports several deployment-related tokens:
| Token | Description |
|---|---|
occurred.after:'last deploy' | Errors that occurred since the most recent deployment |
revision:"v1.0" | Errors that occurred from a deployment with this revision |
is:pending_resolution | Errors set to resolve on the next deploy (when auto-resolve is disabled) |
The occurred.after:'last deploy' token is useful for spotting errors in new code, especially when combined with environment or assignee filters.
Reporting deployments
Section titled “Reporting deployments”To track your deployments, you’ll need to notify Honeybadger each time you deploy. There are several ways to do this depending on your stack:
Client libraries
Section titled “Client libraries”We have language-specific deployment tracking guides for Ruby, JavaScript, PHP, Python, and Elixir.
CI/CD and platform integrations
Section titled “CI/CD and platform integrations”- GitHub Actions: Use the Honeybadger Deploy Action
- Heroku: See the Heroku guide
- Netlify: See the JavaScript guide
- Laravel Forge: See the PHP guide
- DeployHQ: Native Honeybadger integration
Direct API
Section titled “Direct API”For any other tool or pipeline, make a request directly to the Honeybadger API. See the API reference for a full list of parameters.
HONEYBADGER_ENV="production" \HONEYBADGER_REVISION="$(git rev-parse HEAD)" \HONEYBADGER_REPOSITORY="$(git config --get remote.origin.url)" \HONEYBADGER_API_KEY="Your project API key" \ && curl -g "https://api.honeybadger.io/v1/deploys?deploy[environment]=$HONEYBADGER_ENV&deploy[local_username]=$USER&deploy[revision]=$HONEYBADGER_REVISION&deploy[repository]=$HONEYBADGER_REPOSITORY&api_key=$HONEYBADGER_API_KEY"If you are using our EU stack, use eu-api.honeybadger.io instead of api.honeybadger.io.
Honeybadger CLI
Section titled “Honeybadger CLI”Use the hb deploy command in the Honeybadger CLI:
hb deploy --environment production --repository github.com/org/repo --revision abc123 --user johndoeDeployment notifications
Section titled “Deployment notifications”Honeybadger can notify your team when your app is deployed. Any of your configured integrations — Slack, PagerDuty, email, and more — can be set up to receive deploy notifications. If you’re using the webhook integration, see the deployed event payload for the payload format.